Getting mods into Minecraft takes more steps than most players expect. Finding compatible files, matching them to your loader version, and keeping everything current can turn a quick task into an hour of troubleshooting. The Modrinth app handles all of that. It’s a free, open-source launcher built around one of the largest mod repositories in the community, with support for Forge, Fabric, Quilt, and NeoForge across mods, modpacks, shaders, datapacks, and resource packs.
Whether you want to drop straight into a popular modpack or build a custom instance from scratch, this Apex Hosting guide walks you through how to install and use the Modrinth app for Minecraft.
Downloading Modrinth
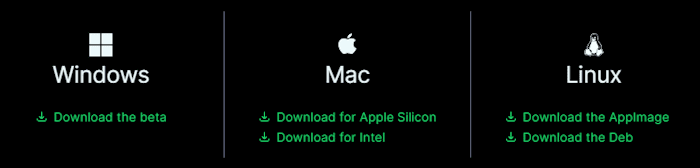
- Navigate to the Modrinth App page, then click
Downloadfor your operating system. - Save this file somewhere easily accessible on your computer, then open it.
- After confirming the setup, click
Installor something similar to finish the installation.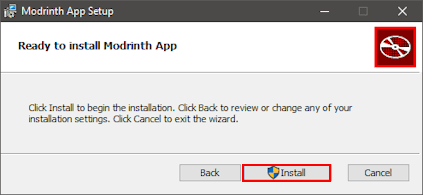
- When it’s done, run the application to begin using the Modrinth app.
Setting Up Your Modrinth Account
After you’ve installed the Modrinth App, you’ll want to click the Get Started button when prompted. This allows you to login with your Microsoft email that’s linked to your Minecraft account, along with setting up other credentials for their service. Once you’ve done all this, you can begin installing modpacks, creating custom profiles for standalone mods, or even importing other instances from different launchers. Whether you want to play on DawnCraft with friends or simply try out Apotheosis, you have plenty of options. When you’re ready to learn how to use Modrinth, review the following subsections to get started.


Installing Modpacks
By far the most popular feature of the Modrinth App is installing modpacks, as it’ll quickly and automatically set up all the needed mods for you to play in Minecraft. Whether you use Forge, Fabric, Quilt, or NeoForge, you’re given the opportunity to search for packs for them all. With this in mind, follow along below to begin this process.
- While on the Modrinth app, click the
Searchbutton on the left-hand side. - Afterward, continue to use the
Filteroptions to narrow down what modpacks you want.
Note: You may also use theSearch Modpacksfield if you already have one in mind. - Once you’ve found the desired modpack, click the
Installbutton near the bottom right. - Wait for this to finish downloading, then head towards your
Libraryand clickPlayon it.

Once your client modpack is running, you can also install a modpack on your Apex server so friends can join on the same version.
Creating Custom Profiles
Rather than using premade modpacks, you can create your own with any desired mods via custom profiles or instances. These are completely customizable, from the loader type to the Minecraft version you want. Keep in mind that you’ll need to manually find and add the mods to this profile after creating it, which is easily done in the Modrinth App. However, this isn’t only for modifications since you can install datapacks, shaders, and even resource packs too. The instructions below will guide you through the entire process.
- In the Modrinth app, click the
Plusbutton near the bottom left corner. - Proceed to fill out the Name, Loader, and Game Version fields accordingly.
- Once you’re finished, click
Createat the bottom right corner. - Wait for this to download all required files, then navigate to the profile.
- Afterward, click
Add Contentto begin installing addons on your new instance.
Note: Use the Filter options to accurately find your mods, datapacks, etc. for the profile.

After building your profile, you can add mods to your Minecraft server to match your client setup for multiplayer play.
Importing Profiles
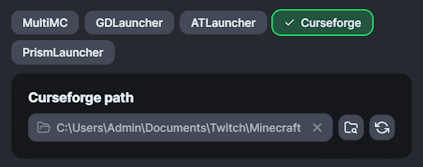
If you’ve used other services like ATLauncher to play with mods and modpacks, then importing your existing profiles on them to Modrinth is possible. This comes in handy if you or others already created a custom instance with everything configured, as it can be frustrating to redo that process on this new launcher. Whenever you’re ready to begin, the steps below will help you achieve this goal.
- Proceed to click the
Plusicon near the bottom left corner in the Modrinth app. - Near the top left corner in the prompt, press the
Import From Launcheroption. - After doing this, continue to select your desired launcher from the list.
- Find or type the directory pathway for the Instances subfolder in the text box.
Note: Don’t include the “…\Instances” in the pathway, as it’s a subfolder. - Continue to click the
Refreshbutton, then check mark your desired Profile in the list. - Do this for all your wanted instances, then press
Importat the bottom to transfer them.

Modrinth App Settings
In some cases, tweaking the Modrinth App’s options is required for your setup. These are accessible by pressing the Settings icon at the bottom left corner of the application. A few options worth reviewing when getting started:
- Memory allocation — Drag the Java memory slider to set how much RAM Minecraft receives. Most modpacks with 100+ mods run well with 6-8 GB. Leave at least 2-4 GB free for your operating system to avoid crashes.
- Java settings — The app manages Java automatically. If a specific modpack requires a particular Java version, you can override the path and version per instance from here.
- Game resolution — Set a default window size so Minecraft launches at your preferred resolution each time without manual adjustment.
- Default instance options — Apply memory or Java settings globally to all new profiles rather than configuring them one by one.
Memory changes take effect on the next game launch.

Frequently Asked Questions
Yes. The Modrinth app is completely free to download and use. There is no subscription or payment required to install modpacks, create custom profiles, or manage your instances.
Yes. The Modrinth app supports Forge, Fabric, Quilt, and NeoForge. You can select your preferred loader when creating a custom profile, and modpack search results can be filtered by loader type.
The Modrinth app manages your client-side launcher. To run mods on a server, you need to install compatible server mod files through your server’s file manager or panel. See the guide to adding mods to a Minecraft server for the full process.
Yes. The Modrinth app has a built-in import tool that supports profiles from ATLauncher and several other popular launchers. Follow the Importing Profiles steps in this guide to transfer your existing instances.
Conclusion
Whether you’re using modpacks or building a custom profile with standalone mods, the Modrinth app gives you the tools to do both. It’s now one of the most widely used Minecraft launchers, with a library covering mods, modpacks, shaders, datapacks, and resource packs all in one place. From installing your first modpack to setting up a full server for friends, we hope this Apex Hosting guide helped you get started with Modrinth.