Overview
Keeping Minecraft modpacks updated on your server and launcher are important for ensuring you or others can easily join. It can be a lot of fun to play, but when a new update is released, it can be difficult to change the pack’s version. A good example of this is that the server files don’t automatically switch versions when the modpack’s author(s) update it. That means you have to manually update the files on your server to get it on the latest version. Additionally, you have to confirm that the modpack version on your client matches the server’s version. In other words, there are two processes for updating the pack. In this Apex Hosting resource, we will guide you through updating a Minecraft modpack on your server and launcher.
How to Update a Modpack
Updating your Minecraft modpack on both the server and launcher is crucial. If you only update your client and not the server, then you can’t join due to a mismatched modlist error or another issue. The same thing happens if you only update the server and not your launcher. Before updating anything, double-check the latest server version we have in the system so you know which one to install. You can do that by heading to our Modpack Server List page.
Server
If you installed the modpack via our installer, then the server can regenerate the files to update it. The way to do that is by deleting certain folders via the FTP Panel. The following steps will show you how to do that. However, if you manually installed a modpack – then you must redo that installation to update it.
- Head towards your Apex server panel and press
Stopat the top. - Proceed to click
FTP File Accessat the top left, then use your password to login.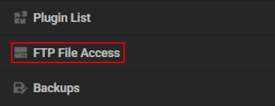
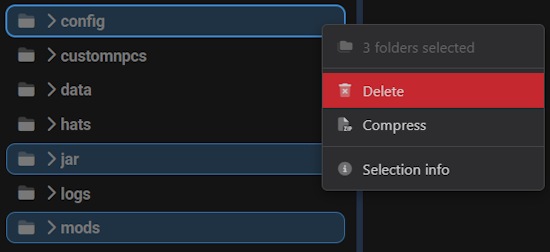
- Locate the
config,jar, andmodsfolders in the list. - Right-click one of them and click Delete to remove it from the server.
- Press
Deleteagain in the next prompt to confirm this action.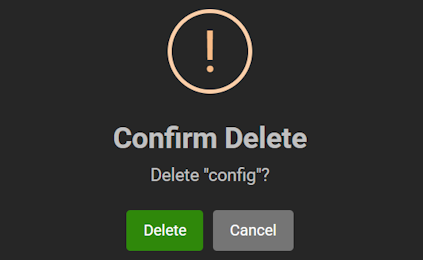
- Repeat this for each folder, then return to the main server panel.
- Start up the server so it can regenerate the updated modpack files.
Note: In rare cases, deleting other folders such as defaultconfigs, scripts, patchouli_books, kubejs and structurize are required to fully update the pack.
Launcher
Once the server is updated with the latest version, ensuring your client-sided pack is updated will make sure your connection is successful. There are different launchers to run modpacks, which all have unique ways for updating the pack. In some cases, you may find multiple instances of the same modpack on different launchers. You want to ensure that you’re using the correct client to play and update the pack.
CurseForge
- Open the CurseForge program and head towards the My Modpacks section.
- Click on the desired modpack profile and press the three vertical dots.
- Once there, locate and select the
Change Versionoption.
- Under the Select Modpack Version category, click the dropdown menu and press the latest one.

Note: The latest version should be at the top of the list.
- After that, proceed to
Continuenear the bottom and wait for the modpack to completely update.
Technic
- Open your Technic Launcher and head to the Modpacks section near the top.
- Locate and click the outdated pack, then in the top right corner press Modpack Options.
- Make sure the
Latest Versionbutton is selected and continue toReinstallPack.
- If it prompts you to confirm the changes, do that and it should have reinstalled the modpack.
Note: If the pack is not updated, then you would want to use theA Specific Versionoption to select the latest one.
Feed the Beast
- Launch the FTB App and head towards your Library section.
- Select the desired modpack and press
VersionsorUpdate Available.
- If you clicked
Versions, then make sure to use theLatestoption and continue toUpdate.
- Regardless of the method you used, wait for the modpack to fully download and when that completes you’ll see a “Modpack Installed!” message at the bottom.
ATLauncher
- Open the ATLauncher program and head to your Instances page.
- After that, select the outdated modpack and press the
Edit Instancebutton then clickReinstall.
- In the Version to Install section, select the latest build of the modpack.
Note: It should be at the top in the version listing area.
- Once you do that, continue to
Reinstallthe pack and wait for the “…has been reinstalled” message.
Voids Wrath
- Run the VoidLauncher application and head to the Mod Pack area.
- Select the outdated modpack and press
Reinstall.
- You’ll be prompted to confirm the process, so click
Yesand select an option for the backup prompt. - Afterward, wait for it to fully reinstall and it’ll automatically launch Minecraft.
- Go to your Apex server panel and stop the server
- Click the FTP File Access tab and log in
- Select and remove the folder called jar
- Start the server back up
Common Issues
The modpack version isn’t automatically updating
The modpacks available in the Apex Game File dropdown menu do not automatically update. If you need to change it, you can force the update by:
This won’t wipe your world or progress.
Conclusion
Successfully updating your Minecraft modpack on the server and launcher will make sure all player connections are stable. Updating the server requires you to use the FTP panel so you may delete the outdated files, then regenerate them after a restart. It also guarantees that you use the latest features and functions from the pack, among fixing any bugs from it. There are many launchers to play on modpacks, which have different updating methods. Make sure to choose the right version or the latest option depending on the client you use. Once everything is set up, you can join without any problems and start playing on your Apex Hosting Minecraft server.
Useful Links
Modpack Server List
Mismatched Modlist Error
How to Connect and Use FileZilla
How to Manually Install Modpacks