If your PC struggles to run Minecraft with shaders, you’re not stuck with a plain vanilla world. Several shader packs are built specifically for low-end hardware, and the right one can transform your game’s lighting, water, and atmosphere without killing your frame rate. This guide covers the top picks for 2026, how to install them using either OptiFine or Iris, and what to do when performance problems appear.
What You Need Before Installing Shaders
Before downloading any shader pack, make sure you have one of the following shader loaders installed:
OptiFine is the traditional choice. It bundles performance improvements and shader support into a single mod. Download it from the official OptiFine site and run it as a Java installer to create a new profile in the Minecraft launcher.
Iris + Sodium is the recommended option for low-end PCs in 2026. Sodium handles rendering optimisation — it frequently doubles frame rates compared to vanilla Minecraft — and Iris adds shader support on top of it. The combination delivers 20-40% better performance than OptiFine with the same shader pack. Download Iris from irisshaders.dev, which installs both mods together via Fabric.
Once your shader loader is ready, you can download any pack and drop it into the shaders folder. The install steps later in this guide cover both loaders.
Best Shaders for Low End PCs

The packs below run on integrated graphics and entry-level GPUs. Each one has customisable settings, so if any pack feels too heavy at default, dial down shadows, chunk distance, or ambient occlusion in the shader options until performance stabilises.
Super Duper Vanilla Shaders

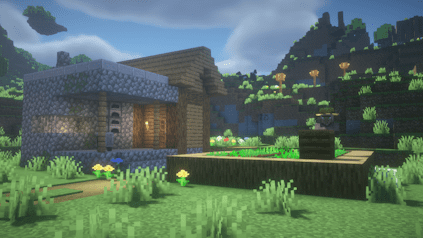
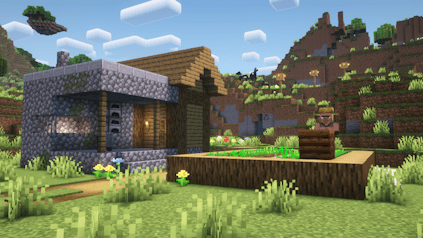
Super Duper Vanilla Shaders keeps Minecraft’s blocky art style while adding improved cloud rendering and warm glow from light sources. The result is a Minecraft that looks polished without abandoning the original aesthetic.
From version 1.3.7 onward (released July 2025), this shader requires Iris 1.6.10 or higher — OptiFine is no longer supported for current builds. Use the Iris + Sodium install path described below if you want the latest version.
Note: the creator states this pack may not work on macOS and Linux systems.
CaptTatsu’s BSL Shaders
BSL Shaders by CaptTatsu is one of the most downloaded shader packs on CurseForge, with over 74 million downloads. It includes real-time shadows, volumetric lighting, ambient occlusion, and a customisable colour palette. Despite those features, low-end PCs can run it with the right configuration.
Disabling depth of field, motion blur, and bloom in the shader options pushes frame rates up substantially. BSL supports both OptiFine and Iris, and stays current with each new Minecraft release — the latest build is v10.1.3, released April 2026.
Skylec Shaders

Skylec Shaders takes a subtle approach: realistic lighting and soft colours without heavy performance costs. Trees, grass, and foliage have gentle wave animations, and water gets rippling effects and reflections. The pack still functions on current Minecraft versions, though it has not received active development since around 2022.
If you want a maintained fork with additional settings and improvements, SkyLEX Shaders is a direct continuation of the same code base.
Complementary Reimagined Shaders
Complementary Reimagined enhances Minecraft’s art style rather than replacing it. Volumetric lighting, layered shadows, and realistic water reflections appear across all biomes, while the preset system — ranging from Potato to Ultra — lets you match the visual load to your hardware.
On the Potato or Lite preset, this shader runs on integrated graphics. Current version is r5.6.1 (February 2026), and it supports both OptiFine and Iris.
Potato Shaders

Potato Shaders by RRe36 is the most lightweight option in this list. It adds smoother ambient lighting and basic shadows without touching the heavier effects that strain low-end systems. If every other pack causes unplayable lag, Potato Shaders is the fallback that works.
All effects are optional and toggled through the shader settings. It supports both OptiFine and Iris, and requires a GPU with OpenGL 4.0 support (standard on any hardware from 2012 onward).
MakeUp Ultra Fast Shaders
For hardware that struggles even with the packs above, MakeUp Ultra Fast is worth trying. Developed specifically for low-spec machines, it has over 40 million CurseForge downloads and receives regular updates. All visual effects — shadows, depth of field, volumetric clouds, reflections, waving plants — are optional, so you can enable only what your hardware handles. It runs on hardware where other shaders refuse to load, and it is actively maintained as of April 2026.
How to Install Shaders in Minecraft
The process differs slightly depending on whether you use OptiFine or Iris. Both routes end the same way: dropping a shader file into a folder and selecting it in-game.
Installing Shaders with OptiFine
Before starting, download and install OptiFine for your Minecraft version from optifine.net. This creates a new profile in your Minecraft launcher. For further help installing mods with Forge, Apex has a dedicated guide.
- Launch Minecraft with the OptiFine profile, then open Options from the main menu.

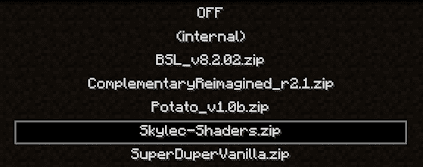
- Go to Video Settings, then select Shaders. Click the Shaders Folder button at the bottom left to open it.

- Drag and drop the downloaded shader
.zipfile directly into this folder.
- Return to the Shaders screen, select the pack from the list, and click Done. Load your world to activate it.
Note: If the pack runs slowly, open Shader Options and lower shadow quality, disable motion blur, or reduce bloom intensity.
Installing Shaders with Iris
Download Iris from irisshaders.dev and run the installer, selecting your Minecraft version. This installs Iris and Sodium together through Fabric.
- Open the Minecraft launcher, select the Iris profile, and click Play.
- From the main menu, go to Options > Video Settings > Shader Packs.
- Click Open Shader Pack Folder, then drag your downloaded shader
.zipinto it. - Return to Minecraft, click Refresh Shader Packs, select your pack from the list, and click Apply.
You can install as many packs as you want and switch between them without restarting the game.
Common Issues
If shaders do not appear or the option is greyed out, the most likely cause is that neither OptiFine nor Iris is active. Check your launcher profile — you need to launch with the OptiFine or Iris profile, not the default Minecraft profile. If the profile is correct, reinstall the shader loader and try again.
Some shader packs have version requirements. Super Duper Vanilla Shaders v1.3.7+ only works with Iris 1.6.10 or higher — it will not load under OptiFine. Check the pack’s download page for compatibility notes before installing.
Launcher crashes while loading shaders almost always come down to not enough allocated memory. Shaders increase the rendering load, which needs more RAM. In your launcher’s profile settings, raise the -Xmx value — start at 4 GB (-Xmx4G) if it is currently lower. For a practical guide on how much RAM Minecraft needs, Apex has a dedicated reference.
If allocated memory is already sufficient, the issue may be with the OptiFine installation itself. Download the latest OptiFine build for your Minecraft version and reinstall it. If you are on Iris, verify you are running the current version from irisshaders.dev.
Lag with shaders active usually has three causes: the shader pack is too demanding for the hardware, background applications are consuming CPU/RAM, or a specific shader effect is conflicting with a game element.
Start by closing browsers, Discord, and any other applications not needed for playing. Then open the shader’s settings menu in-game and disable the most expensive effects — volumetric lighting, bloom, and motion blur are common culprits. If the problem is visual glitches (flickering, black patches), try a different version of the same pack, as bugs sometimes appear in specific builds.
Frequently Asked Questions
What are the best shaders for low end PCs in Minecraft?
The top picks in 2026 are Potato Shaders and MakeUp Ultra Fast for the most constrained hardware, BSL Shaders and Complementary Reimagined (on Potato preset) for mid-range low-end systems, and Super Duper Vanilla or Skylec for a subtler visual upgrade.
How do I install shaders in Minecraft?
Download OptiFine or Iris for your Minecraft version. Launch the game with that profile. Open Options > Video Settings > Shaders (OptiFine) or Options > Video Settings > Shader Packs (Iris). Click the folder button, drag your shader .zip in, and select it from the list.
Why are shaders lagging on my low end PC?
Shaders strain GPU and CPU simultaneously. To improve performance: lower the shadow quality in shader options, disable motion blur and bloom, close background applications, and allocate more RAM to Minecraft from your launcher settings. Switching to Iris + Sodium instead of OptiFine can also recover 20-40% of frame rate.
Which Minecraft shaders work on Intel integrated graphics?
Potato Shaders, Skylec Shaders, MakeUp Ultra Fast, and Complementary Reimagined on the Potato preset are designed to run on integrated graphics. All four work without a dedicated GPU, though settings adjustments may be needed.
Can I run shaders in Minecraft without OptiFine?
Yes. Iris + Sodium is a full alternative to OptiFine for running shaders. Install Iris via the installer at irisshaders.dev and it sets up the Fabric mod loader, Sodium, and Iris together. All OptiFine-compatible shader packs work with Iris, and performance on low-end hardware is generally better than with OptiFine.
What is the lightest shader for Minecraft?
Potato Shaders and MakeUp Ultra Fast are the two lightest options. Both are built for low-spec systems and let you disable individual effects to reduce load further.
Are Minecraft shaders safe for low end computers?
Yes, as long as you download from official sources such as CurseForge, Modrinth, or the shader’s own website. Shaders increase rendering load, so on very old hardware, keep an eye on temperatures and start with the lightest packs or lowest presets.