Overview
Playing Minecraft with mods is by far one of the best ways that you can enhance your gameplay experience. Adding mods to your server/client is easy enough as they just require Forge client-side. However, this is not the case with every mod out there. It’s possible that you may have run into a mod that requires “Fabric”. Fabric is a pretty small modloader that has a separate API required by Fabric mods. Similar to Forge, Fabric has to be installed on your Minecraft server and your Minecraft client. Learning how to install this onto your Minecraft server can be a bit tricky, but we will be walking you through each step of it.
Keep in mind that Fabric and Forge are not compatible with each other as they are both separate modloaders.
How to add Fabric
Downloading Fabric
In order to install Fabric on your own server, you will first need to download and install the version.
- You will want to create a folder on your computer for later use, this can be named anything.
- Head to the official Fabric website and click on
Download installer (Windows/.EXE) - Go to your downloads and run the Fabric installer.
- Towards the top of the installer, click on the
Servertab. Then choose your Minecraft Version.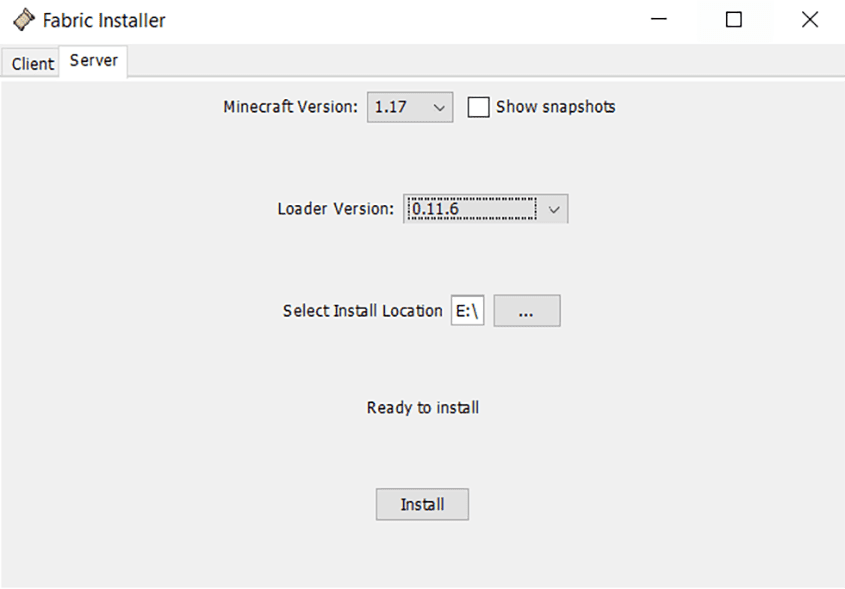
- Under
Select Install Location, click the 3 dots and navigate to the folder you made in step one. - Click
Install, you may see a popup saying you need the official Minecraft Server version installed. Just go ahead and click onDownload Server Jar - Once installed, you will see two files in the folder you made.
Fabric-server-launch.jarandserver.jar - Rename
fabric-server-launch.jartocustom.jar.
Server Version
- Navigate to your Apex Server Panel, then stop the server.
- Locate the JAR File section and click the dropdown.
- Search
customand selectCustom Server Jar.
- Reset the world when prompted, or proceed at the risk of world corruption.
- It is recommended to restart later, as the server will not fully start yet.
Uploading to the Server
- Head to
FTP File Accessfrom your Apex server panel. - Open the
jarfolder, then clickUploadto the left of the panel. - Drag + drop the
custom.jarfile from the folder you made and wait for it to fully upload to 100%.
- Head back to the main FTP page of the panel and then upload the
server.jarfile to there. - Once at 100%, click the server name at the top to return to the main page.
- Start/restart your server and you should now have Fabric installed!
(Version Dependent) Using Java 16
In more recent versions, such as 1.17, you may need to perform a few different changes compared to the previous steps. These changes are:
- Rename the
fabric-server-launch.jartocustomj16.jarinstead. - Under the JAR File dropdown, select
Custom Java 16.
Common Issues:
Non-matching version is present:
This will often occur when running later versions of Minecraft. Make sure to follow the version dependent instructions above to use Java 16 instead. Once the version and file are changed accordingly, you can restart once more to see if it starts correctly.
Getting “Could not find Minecraft server JAR (server.jar)!” error in console on startup:
This error means that you did not upload the server.jar into the main directory of your FTP. If you get this, stop your server, head to FTP File Access, press Upload and drag in the server.jar from the folder you created from the first step in this guide. Once it’s fully uploaded, restart your server.
I’m getting world errors and crashing:
Oftentimes, this can occur if a version is changed backwards, such as going from 1.17 to 1.16. When changing server versions, it is highly recommended to generate a new world to prevent this from happening. To do this, go to your Apex server panel, then scroll to the World section. Press the Change World button, then input a unique name. Once done, restart to try once more!