Ever found an amazing build online or designed a masterpiece in a creative world, only to struggle when trying to rebuild it block-for-block in survival? Litematica is the ultimate blueprint tool that lets you import, display, and manage schematics directly in-game. As the spiritual successor to the classic Schematica mod, it’s been rebuilt specifically for Minecraft Fabric. Don’t you worry though, it’s compatible with other mod loaders.
In this Apex Hosting guide, we’ll show you exactly how to install this powerful client-side mod and get started with its most essential features. Let’s get building! 🧱
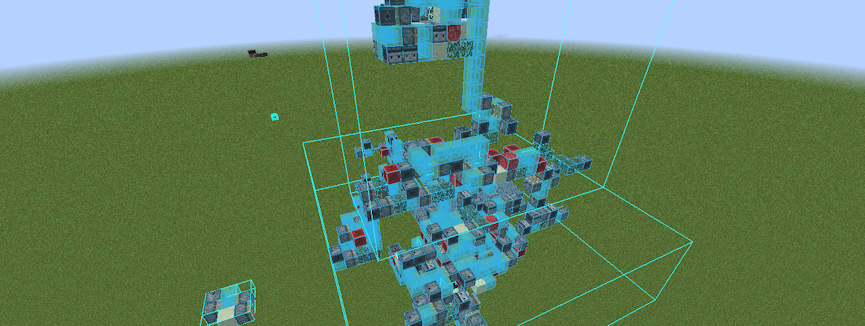
Litematica Showcase
Now that the mod is installed, let’s cover the essentials of loading and using a schematic.
The Main Menu & Keybinds
Litematica is controlled almost entirely by its menu and hotkeys. The most important key to remember is M, which opens the Litematica main menu and gives you access to all its features. For more advanced settings, you can press M + C to open the Configuration Menu, where you can tweak visual settings and change all keybinds.
Loading a Schematic
Before you can load a schematic in-game, you must place the schematic file (which usually ends in .litematic or .schem) into the correct folder. You can find this in your .minecraft directory inside a folder named schematics. If this folder doesn’t exist, you can create it.
Once the file is in place, go in-game and press M to open the main menu, then click Load Schematics. You will see a list of your available files; simply select the one you want and click Load Schematic to make it active.
Positioning Your Schematic
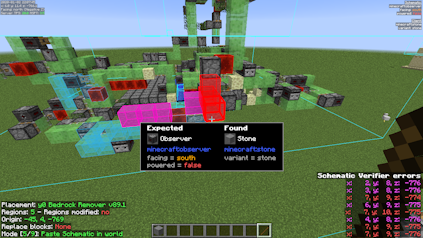
When a schematic first loads, it may be underground or far away from your build site. To move it, press M and go to Schematic Placements. Find your loaded schematic in the list and click Configure. This menu gives you full control to move the “ghost” preview. You can use the X/Y/Z controls to nudge it into place, Rotate it, or use the Move to Player button to quickly snap it to your location.
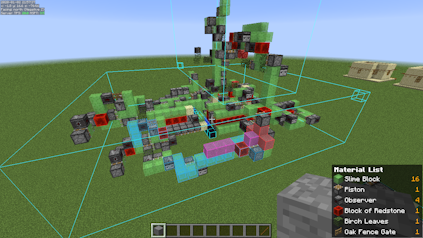
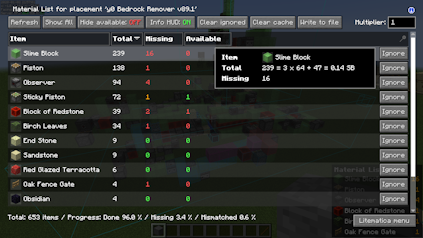
Checking the Material List
For survival players, the most powerful feature is the material list. After loading your schematic, you can press M + L to instantly open the Material List window. This provides a complete “shopping list” of every single block and item required for the build, even tracking what you’re “Missing” as you gather resources.
Build Your Masterpiece
Recreating complex builds from memory or a YouTube video is a tedious, frustrating process. Litematica solves this completely by giving you a perfect in-game blueprint and a material checklist. Whether you’re building a massive storage system or a beautiful castle, this mod turns any project into a simple “follow the leader” task.
Litematica Mod Installation
The following sections show you how to download and install the mod to Minecraft 🔥
How to Download
- Navigate to Litematica (Modrinth / CurseForge) and download it.
- Make sure to choose the right file for your
Mod Loader&Game Version. - Save the mod file somewhere easily accessible on your computer.
⚠️ Depending on your version, MaLiLib might be required as a dependency mod.
Similarly, FabricAPI is required for those running on any Fabric version.
How to Install
If you haven’t already, install Fabric or Forge on your Minecraft launcher to run the mod. Alternatively, you can install a third-party launcher such as CurseForge or LiteLoader.
Follow these instructions if you use the default launcher for Minecraft.
- Make sure Fabric or Forge is installed.
- Open the Minecraft Launcher →
Installationstab. - Click the
folder iconnext to your Fabric or Forge profile. - Open (or create) a folder named mods.
- Move the
.jarfile and required mods into that folder. - Launch Minecraft with your Fabric/Forge profile.
Follow the steps below if you use CurseForge, LiteLoader, etc..
- Open your launcher and select your modpack or profile.
- Click
Add More ContentorInstall Mods. - Search for “Litematica”.
- Click
Install– dependencies will install automatically. - Launch the game to start using the mod.
You do not need to install the mod on your Minecraft server to use its features.