Overview
Simple Voice Chat is a proximity chat mod and plugin that allows you to chat with other nearby players without having to join a discord server or voice channel. This mod gives an extra level of immersion to the game and is a must have for any hosted Minecraft server. It can be a bit difficult to get Simple Voice Chat setup and running if you are unfamiliar with it, so we have created this guide to ease you through the setup process.
Plugin Installation
The first version available is a plugin, compatible with versions such as Spigot or PaperMC. This version can be used most effectively with vanilla versions and other plugin files you may desire. This version of Simple Voice Chat requires the Fabric mod to also be installed on your device. You can find out more about Fabric here.
Server Preparation
-
- Navigate to your Apex Server Panel, then scroll down to the
JAR Filefield. - Using the dropdown, ensure the version is plugin-compatible, such as Spigot or PaperMC.

- If you need to change the version, ensure you restart the server at least once.
- Navigate to your Apex Server Panel, then scroll down to the
Adding the Plugin
-
-
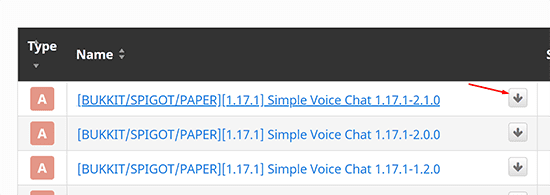
- Locate the Simple Voice Chat download page.
- Select the version that fits your server, then press the download button.
- Make sure to also install ProtocolLib, as it is a required dependency.
- Navigate to your Apex Server Panel, then stop the server.
- Proceed to the
FTP File Access, then log in. - Locate and enter the
pluginsfolder, then pressuploadin the top-left.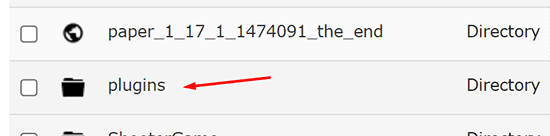
- Drag + drop the plugin .jar files.
- Once at 100%, start up the server to load Simple Voice Chat.
-
Forge/Fabric Installation
The alternative versions of Simple Voice Chat are mods for either Fabric or Forge. This is helpful if your server is already running mods, or you plan to add more.
Server Preparation
-
-
-
- Navigate to your Apex Server Panel, then scroll down to the
JAR Filefield. - Using the dropdown menu, select your desired version of either Forge or Fabric.

- Once selected, restart the server when prompted.
- Navigate to your Apex Server Panel, then scroll down to the
-
-
Adding the Mod
-
-
-
- Navigate to the Simple Voice Chat CurseForge page.
- From here, locate the file based on your version or Forge or Fabric, then press “download”.
-
-

-
-
-
- Navigate to your Apex Server Panel, then stop the server.
- Proceed to the FTP File Access, then enter the
modsfolder. - Press
Uploadin the top-left, then drag + drop the mod .jar file.
- Once complete, start up the server to load the mod.
-
-
Configuring Simple Voice Chat
-
-
-
- Before proceeding, ensure you visit your Apex Server Panel, then note down your IP and Port.

- Navigate to the
FTP File Access. - Depending on your version, proceed to the following:
- Before proceeding, ensure you visit your Apex Server Panel, then note down your IP and Port.
-
-
Spigot Configuration:
plugins > Simple Voice Chat folder > Edit the voicechat-server file.
Forge Configuration:
Config folder > voicechat folder > Edit the voicechat-server.properties file.
Fabric Configuration:
Config folder > Edit voicechat-server.properties
-
-
-
- Once in the folder, locate the
bind_addressline. Change this to your server’s IP. - Next locate the
portline. Change this to your server’s port.
- Once done, save at the top, then restart your server.
- Once in the folder, locate the
-
-
Your server should now launch using your desired version of Simple Voice Chat!
Note for Players
Similar to players needing Forge and the mod installed client-side to join a Forge server, players will need to add the Simple Voice Chat Fabric version to their client to participate in Fabric and Spigot servers.
Using the mod
Once Simple Voice Chat is installed and running, the controls to use it are fairly straightforward.
Caps-Lock: Activate push-to-talk
M: Mute yourself
N: Toggle the mod
H: Hide icons
V: Open mod settings.
G: Manage group.
Configuring for MCShield and Connection Issues
If you’re using our MCShield addon or if your players are having trouble connecting to the voice chat, a small but crucial configuration change is often needed to get things working perfectly. This extra step manually tells the voice chat plugin which IP address and port to use, ensuring a solid connection.
Servers with the MCShield Addon
When the MCShield addon is active on your server, you must define the voice_host for the voice chat plugin or mod to work correctly.
- Open your Server Control Panel and navigate to FTP File Access on the left-hand menu, then log in.
- Navigate to the configuration directory.
- Locate the
voicechat-server.propertiesfile and click Edit. - Find the line that says
voice_host=. - Set this value to your server’s IP and the voice chat port in an IP:PORT format. For example:
voice_host=98.111.5.111:24451
Note: The port you use here (24451 in the example) must match the port number set for theport=setting in the same file. - Click Save and Restart your server.
Fixing General Connection Issues
Even if you don’t have the MCShield addon, you might run into a situation where the console shows that the voice chat is running correctly, but players see a persistent unplug icon in-game and can’t connect. This almost always means the plugin is failing to bind to the correct network address automatically.
Thankfully, the solution is the same! By manually setting the voice_host, you can force the plugin to use the correct address and resolve the connection problem.
Simply follow the exact same steps listed above: edit the voicechat-server.properties file and set the voice_host= to your server’s numeric IP and voice chat port (e.g., 98.111.5.111:24451). After a save and restart, your players should be able to connect without any issues!
Common Issues
Voicechat keeps crashing
When VoiceChat is installed on a server for the first time, it attempts to use the default port 24454. If other servers on the same node are already using that port, it can cause your server to crash. If this occurs, you should see something like this in the console:
[Server] VoiceChatServerThread/INFO [voicechat] Using server-ip as bind address: IP ADDRESS

[Server] VoiceChatServerThread/ERROR [voicechat] Failed to bind to address 'IP ADDRESS', binding to wildcard IP instead

[Server] VoiceChatServerThread/ERROR [voicechat] Failed to run voice chat at UDP port 24454, make sure no other application is running at that port

[Server] VoiceChatServerThread/ERROR [voicechat] Voice chat server error
To resolve this isse:
- Open your Server Control Panel and stop the server.
- Go to FTP Files Access and log in.
- Open the Config folder, locate the voicechat folder, and open it.
- Edit the voicechat-server.properties file.
- Change port=24454 to another number between 11111 and 33333 (avoid using your server’s main port).
- Save and restart the server.
Conclusion
Proximity chat can be incredibly useful on any server for a variety of reasons. It can add an extra layer of immersion by allowing players to talk to each other normally when they are close to each other. It can also be used in team based minigames like Bedwars, or just to talk privately with your friend group. The versatility and availability of the mod makes it usable on just about every popular server type except vanilla. This is a popular addition that players will thoroughly enjoy if you do not have a Discord server, or just don’t want to use Discord for voice chat.