Overview
Minecraft has no native voice chat. Bedrock Edition supports platform-level party chat through Xbox Live, but Java Edition has never included voice communication. Most players rely on Discord or similar apps, which work fine but sit outside the game entirely. Simple Voice Chat changes this by adding proximity-based voice communication directly into Minecraft. Players hear each other based on in-game distance, and the system runs through your server with no external apps required.
What Is Simple Voice Chat?
Simple Voice Chat is an open-source mod and plugin created by henkelmax that adds proximity voice communication to Minecraft Java Edition. Players within range hear each other through in-game audio that gets quieter with distance. The mod also supports group calls, player muting, and configurable audio settings.
It works as both a server-side plugin (for Spigot and Paper) and a mod (for Forge, NeoForge, Fabric, and Quilt). This makes it compatible with nearly every popular Minecraft server type. Whether you run a vanilla server with plugins or a fully modded setup, it fits right in.
Requirements and Compatibility
Before installing, confirm your setup meets these requirements.
Server side:
- Spigot, Paper, Purpur, or Folia (plugin version) with ProtocolLib installed
- Forge, NeoForge, Fabric, or Quilt (mod version)
- Minecraft 1.12+ (plugin) or 1.14+ (mod), including the latest 1.21.x releases
Client side:
- All players need the Simple Voice Chat mod installed on their client, regardless of server type
- Use the version matching your client’s mod loader (Fabric, Forge, NeoForge, or Quilt)
- Players without the mod can still join and play normally; they just won’t have voice chat
Network:
- One open UDP port (default: 24454)
- If hosting with Apex, port configuration is covered in the setup steps below
Download sources: It is available on Modrinth, CurseForge, and BukkitDev.
Plugin Installation (Spigot and Paper)
The plugin version runs on Spigot, Paper, and similar server software. If you’re running a vanilla or plugin-based server, this is the version to use. For general guidance on adding plugins to your server, see our dedicated guide.
Server Preparation
- Navigate to your Apex Server Panel, then scroll down to the “
JAR File” field. - Using the dropdown, ensure the version is plugin-compatible, such as Spigot or PaperMC.

- If you need to change the version, ensure you restart the server at least once.
Adding the Plugin
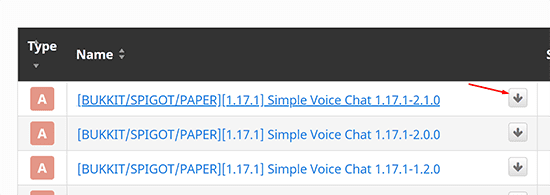
- Locate the Simple Voice Chat download page.
- Select the version that fits your server, then press the download button.
- Make sure to also install ProtocolLib, as it is a required dependency.
- Navigate to your Apex Server Panel, then stop the server.
- Proceed to the “
FTP File Access“, then log in. - Locate and enter the
pluginsfolder, then press “upload” in the top-left.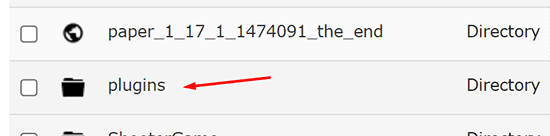
- Drag + drop the plugin .jar files.
- Once at 100%, start up the server to load Simple Voice Chat.
Mod Installation (Forge, NeoForge, and Fabric)
If your server already runs mods or you plan to add more, install it as a mod instead. The mod version is available for Forge, NeoForge, Fabric, and Quilt.
For Minecraft 1.21 and newer, NeoForge has become the primary Forge-compatible loader. If you’re starting a new modded server on 1.21+, NeoForge is the recommended choice. The mod has supported NeoForge since Minecraft 1.20.6.
Server Preparation
- Navigate to your Apex Server Panel, then scroll down to the “
JAR File” field. - Using the dropdown menu, select your desired version of either Forge or Fabric.

- Once selected, restart the server when prompted.
For NeoForge or Quilt, select the corresponding option from the JAR File dropdown if available.
Adding the Mod
- Navigate to the Simple Voice Chat CurseForge page.
- From here, locate the file based on your version or Forge or Fabric, then press “
download“.
- Navigate to your Apex Server Panel, then stop the server.
- Proceed to the FTP File Access, then enter the
modsfolder. - Press “
Upload” in the top-left, then drag + drop the mod .jar file.
- Once complete, start up the server to load the mod.
The mod is also available on Modrinth if you prefer it over CurseForge.
Configuring Simple Voice Chat
After installation, you need to set the voice chat server’s IP address and port to match your Apex server.
- Before proceeding, ensure you visit your Apex Server Panel, then note down your IP and Port.

- Navigate to the “
FTP File Access“. - Depending on your version, proceed to the following:
Spigot Configuration:
plugins>Simple Voice Chatfolder > Edit thevoicechat-serverfile.
Forge Configuration:Configfolder >voicechatfolder > Edit thevoicechat-server.propertiesfile.
Fabric Configuration:Configfolder > Editvoicechat-server.properties - Once in the folder, locate the
bind_addressline. Change this to your server’s IP. - Next locate the
portline. Change this to your server’s port.
- Once done, save at the top, then restart your server.
Your server should now launch with voice chat running.
Client Mod Required: All players need the voice chat mod installed on their client to use voice chat, regardless of whether the server runs the plugin or mod version. Players should download the version matching their client’s mod loader (Fabric, Forge, NeoForge, or Quilt). Players without the mod can still join the server and play normally.
Using Simple Voice Chat
Once installed and running, these default keybinds control the voice chat:
| Key | Action |
|---|---|
| V | Open voice chat settings |
| Caps Lock | Push-to-talk |
| M | Mute your microphone |
| N | Toggle voice chat on/off |
| H | Hide voice chat icons |
| G | Open group management |
The settings menu (V key) lets you adjust microphone sensitivity, speaker volume, voice activation threshold, and audio device selection. Group management (G key) creates private voice channels that work regardless of player distance, useful for team communication in minigames or across large servers.
All keybinds can be remapped through the standard Minecraft controls menu under the Voice Chat category.
MCShield and Connection Issues
If you’re using the MCShield addon or players are having trouble connecting to voice chat, a small configuration change is often needed. This step manually tells the voice chat plugin which IP address and port to use, which resolves most connection problems.
Servers with the MCShield Addon
When the MCShield addon is active on your server, you must define the voice_host for the voice chat plugin or mod to work correctly.
- Open your Server Control Panel and navigate to FTP File Access on the left-hand menu, then log in.
- Navigate to the configuration directory.
- Locate the
voicechat-server.propertiesfile and click “Edit“. - Find the line that says
voice_host=. - Set this value to your server’s IP and the voice chat port in an IP:PORT format. For example:
voice_host=98.111.5.111:24451Note: The port you use here (24451 in the example) must match the port number set for the
port=setting in the same file. - Click “
Save” and “Restart” your server.
Fixing General Connection Issues
Even without the MCShield addon, you might see a persistent unplug icon in-game while the console shows voice chat running correctly. This means the plugin failed to bind to the correct network address automatically.
The fix is the same: edit the voicechat-server.properties file and set voice_host= to your server’s numeric IP and voice chat port (e.g., 98.111.5.111:24451). Save and restart, and players should connect without issues.
Common Issues and Troubleshooting
When the mod is installed for the first time, it attempts to use the default port 24454. If other servers on the same node already use that port, your server can crash. The console will show something like:
[Server] VoiceChatServerThread/INFO [voicechat] Using server-ip as bind address: IP ADDRESS
[Server] VoiceChatServerThread/ERROR [voicechat] Failed to bind to address 'IP ADDRESS', binding to wildcard IP instead
[Server] VoiceChatServerThread/ERROR [voicechat] Failed to run voice chat at UDP port 24454, make sure no other application is running at that port
[Server] VoiceChatServerThread/ERROR [voicechat] Voice chat server error
To resolve this issue:
- Open your Server Control Panel and stop the server.
- Go to FTP Files Access and log in.
- Open the Config folder, locate the voicechat folder, and open it.
- Edit the voicechat-server.properties file.
- Change port=24454 to another number between 11111 and 33333 (avoid using your server’s main port).
- Save and restart the server.
If players are connected to voice chat but cannot hear anyone, check these common causes:
- Distance: Players must be within the configured voice range (default 48 blocks). Move closer and test again.
- Muted: Press M to check mute status. The voice chat icon changes when muted.
- Audio device: Open voice chat settings with V and confirm the correct microphone and speaker are selected.
- Firewall: Some networks block UDP traffic. Players on restricted networks (school, work) may not be able to connect to the voice chat port.
The mod requires matching major versions on the server and client. If a player’s client mod version doesn’t match the server version, voice chat won’t connect. Make sure all players download the same version that matches the server.
Frequently Asked Questions
Does Simple Voice Chat work with vanilla Minecraft?
Not on its own. The server needs either the plugin version (on Spigot/Paper) or the mod version (on Forge/NeoForge/Fabric). Players also need the client-side mod installed. A completely unmodified vanilla server cannot run it.
Can Bedrock players use Simple Voice Chat?
No. It is a Java Edition mod only. Bedrock Edition players connecting through Geyser will not have voice chat functionality.
Is Simple Voice Chat free?
Yes. The mod is open-source and free to download on all platforms (Modrinth, CurseForge, BukkitDev).
What port does Simple Voice Chat use?
The default UDP port is 24454. If that port conflicts with another service on the same node, change it in the voicechat-server.properties file to any number between 11111 and 33333.
Can I use Simple Voice Chat with other mods?
Yes. It is compatible with most mods and modpacks. It also has an addon API that other developers use to add features like sound physics, audio players, and radio systems.
Conclusion
The mod brings proximity voice communication to Minecraft without external apps. It works across Spigot, Paper, Forge, NeoForge, Fabric, and Quilt, covering nearly every server type. The setup process takes a few minutes through the Apex Hosting panel, and configuration is straightforward once you have the correct IP and port values. For servers that want voice communication without requiring every player to join a Discord call, it is the most practical option available.