Overview
Whether you’re making a Factions or SkyBlock Minecraft server, rules are an important aspect to ensure safety and fairness. Most owners don’t want exploiters or cheaters to ruin the fun for everyone else. Some may list the rules on signs or in holographic text, but anyone can ignore them. This leads to possible issues, as users don’t fully understand the guidelines of your server. Solving this introduces the AcceptTheRules Spigot plugin, forcing players to read and accept the rules, hence its name. If someone denies them, they’ll be kicked from the server. This is a wonderful way to make sure all players know what guidelines to follow. The configuration for this is straightforward and easy, but newcomers to the hosting scene can be confused. Due to this, we’ll show you how to install and use AcceptTheRules on your Minecraft server in this Apex Hosting tutorial.
How to Download
- Navigate to AcceptTheRules on Spigot’s website.
- Click
Download Nowto the far right-hand side of the page.
- Save this file somewhere easily accessible on your computer.
Server Installation
Before installing AcceptTheRules, ensure you’ve set the Game File option to Spigot or Paper in the panel since it’s required to support plugins. Once this is completed, proceed to follow along below to start this installation.
- Head towards your Apex server panel, then click
FTP File Accessnear the top left.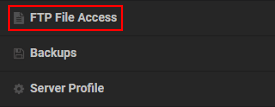
- Proceed to type your
Passwordand press theLoginbutton.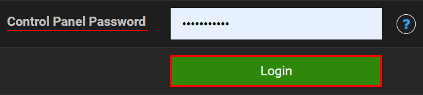
- Locate and enter the plugins directory, then press
Uploadat the top left. - Drag and drop the JAR file in the respective area, waiting for it to reach
100%.
- Afterward, return to the main panel and
Restartthe server to load the plugin.
Getting Started

Upon joining the server, a new chat prompt will appear requesting you read the rules. By default, there are already some to review with the /rules command. However, you’ll need to configure your own messages in the config file to customize them. Once you’ve done this, all players can easily view and accept the rules of your Minecraft server. Otherwise, they’ll be forced to leave until they agree to your guidelines. The subsections below will provide you with critical information about this setup, among other useful details.
Configuration
The first step you’ll likely want to take is setting your rules. This process requires you to access the FTP panel to tweak the rules.yml file. However, there are additional documents to review, such as messages.yml and settings.yml. These control what messages appear from the plugin and its behavior towards players. We’ll break down the rules format later on, but in the meantime follow the instructions below to get started.
- Navigate to the
FTP File Accessarea from the main server panel. - Login and enter the
pluginsdirectory, then click the AcceptTheRules folder.
- On the right-hand side of rules.yml, press
Editto reveal its contents.
- Make any necessary changes to these options, then click
Saveat the top.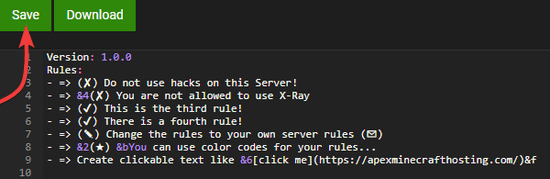
Restartthe server from the main panel to apply the edits.
Rule Formatting
Inside the rules.yml file, the “=>” prefix should remain for every line you want for the best results. However, it’s possible to remove this and proceed with your desired changes. Keep the dash before everything else, as this determines the line when players execute /rules in-chat. The plugin’s format varies, as there are features outside of normal color codes. For example, using HEX to make custom shades appear is possible. Review the list below to begin understanding them, but it’s encouraged to check out AcceptTheRules on Spigot for additional information.
| Description | Syntax | Example |
|---|---|---|
| Color Legacy | &[code] | &4This is Red |
| Color | &[color]& | &gold&This is Gold |
| Hex Color | &#[HEX]& |  a852&This is Green |
| Bold | **[Text]** | **This is Bold** |
| Italic | &o[Text] | &oThis is Italicized |
| Underlined | __[Text]__ | __This is Underlined__ |
| Strikethrough | ~~[Text]~~ | ~~This is Strikethrough~~ |
| Obfuscated | ??[Text]?? | ??Magic?? |
| URL | [Text](Link) | [Click Here](https://apexminecrafthosting.com/) |
| Command | [Text](/Command) | [Click Me](/spawn) |
Accepting Rules
When you’ve configured your rules, Restart the server or use the atr reload command from the server console to apply them. Afterward, simply use /rules in-game to begin clicking through the list. At the end of this, you’ll be prompted to Accept or Deny them. Remember, if players disagree with your guidelines, they’ll be kicked.

The messages can be controlled in the other config files, if you wish to change them. Keep in mind that some formatting may not entirely work properly with them, such as underlines. Using alternative methods such as “&n” to accomplish this goal is recommended.
Bedrock Support

One of the best features from this plugin is that there’s Bedrock support, meaning players on this edition of Minecraft can Accept or Deny the server rules. Using GeyserMC with AcceptTheRules is how you can achieve this compatibility. Although, there may be a bug that kicks Bedrock players despite them accepting the guidelines. Tweaking the settings might be required to resolve this problem, such as disabling kicking. Otherwise, warning these kinds of players in the rules prompt is another workaround for this issue.
Commands
Most of the important commands are enabled by default, as players need immediate access to /rules and the ability to accept them. However, others need specific permissions assigned to ranks in LuckPerms for users to begin using them. Alternatively, becoming a server operator is an option to instantly get full access to everything. Regardless of which method you choose, review the list below to learn more about AcceptTheRules commands.
| Command | Permission | Description |
|---|---|---|
| /rules | atr.user.rules | Ability to view the rules. |
| /rules [number] | atr.user.rules | Ability to view specific rules. |
| /atr | atr.admin.atr | Access to the admin commands. |
| /atr [player] | atr.admin.atr | Shows information about a player. |
| /atr reload | atr.admin.reload | Reloads the plugin to apply recent changes. |
| /atr help | atr.admin.help | Shows a full list of commands. |
| /atr reset [player] | atr.admin.reset | Resets a player’s accept or deny state. |
| /atraccept [player] | atr.admin.acceptOthers | Force accepts the rules for a player. |
| /atr stats | atr.admin.* | Shows user statistics. |
Common Issues
In some cases, the AcceptTheRules plugin will not load on your server due to missing requirements. For instance, you’ll need to have Spigot or Paper for Minecraft 1.8 to 1.19 and above. This can be done in the Game File area of your main panel, as they’re preinstalled for your convenience. Otherwise, you may have uploaded its JAR file into the wrong Server Profile and/or directory. Make sure it’s for the correct one and installed in the …/plugins folder. Restart the server after confirming this so it can begin loading without issues.
Unfortunately, there could be a bug in the plugin that kicks Bedrock players despite them accepting the rules. Due to this, you’ll want to remove the command responsible for this in the settings.yml file. However, once accepted, players can freely play on the server without further issues.
Make sure to remember the message format, such as “- =>” since this works the best. Proceed with caution if you’re doing anything else for this configuration. Sometimes, using incorrect color codes can result in a bad config file. It’s encouraged to keep backups of rules.yml to keep track of your progression.
Useful Links
AcceptTheRules on Spigot
Becoming a Minecraft Server Operator
GeyserMC for Minecraft Servers
Minecraft Color Code Guide